Projects #
Specific projects, activities, or programs will be embarked upon by the organization to meet or accomplish the organization’s goals. The current implementation allows usersto:
- Create a Project
- Map the Project to the larger goals within the organization.
- Create Tasks and Milestones against the project.
- Map KPIs and track the progress of the KPIs.
- Create Outcomes expected out of the implementation of the project.
Add OKR #

- Click on the “New” button on the top left to create a new OKR.
There are four sections to add to an OKR.
- Add OKR: A basic information about the OKR.
- Add Key Results: Ability to add Key Results to be achieved for an OKR.
- Promote: Promote the OKR to various individual/ teams/ organizations.
- Outcome: Create information on the expected outcome of the OKR.
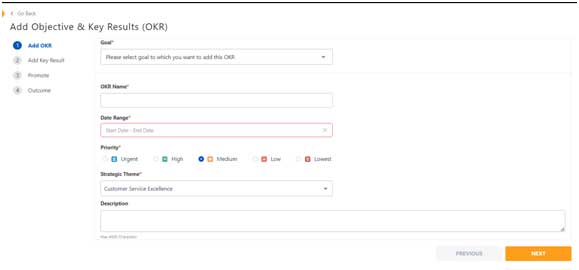
Add OKR Tab
- Goal: Select the goal to which the current OKR needs to be mapped.
- OKR Name: Enter the name/ title of the Objective.
- Date Range: Select the date range for the target start & end date of the OKR.
- Priority: Select the priority of the OKR.
- Strategic Theme: Select a strategic theme against which the current OKR is mapped.
- Description: Enter the description of the OKR for a detailed information about the objective.
Add Key Results
For each Objective, multiple Key Results can be added. Typically there are between three to five key results for each objective.
OKR framework provides three options to add Key Results.
- Task: A type task means, all tasks have Start & End dates along with measure period and a measure to calculate progress of a task.
- Milestone: A type milestone has a set of milestones with Due Dates by when a milestone will need to be completed.
- KPI: A key result can also be measured by KPIs. User will need to select a KPI against which a key result progress can be measured.
Below we will explain each of the types in detail.
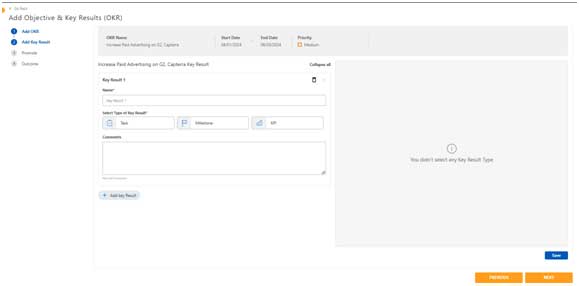
Add Key Result à Type (Task)

Key Result: A user will need to click on “Add Key Result” button to add a new Key Result (KR). User will now enter following details:
- Name: Enter the title/ name of the key result.
- Select Type of Key Result: Here user will be selecting type as Task.
- Comments: An additional description of the key result will be entered by the user to describe the key result.
On the right panel, the user will now have an opportunity to add Tasks against the Key Result. To add additional tasks, users can click on “Add Task” button.
- Name: Enter the name/ title of the task.
- Dates: Enter the start & end date of the task
- Assigned To: Assign the task to a user.
- Measure Period: Select the measure period which is typically between weeks/months/ quarters/ yearly.
- Day of Week/ Month: Based on the measure period, this is a dynamic value which needs to be selected by user.
- Comments: Enter any additional comments about the task.
- Save: Save the task.
- Cancel: Cancel the task and all the details entered. This is applicable before clicking on the Save button.
Add Key Result à Type (Milestone)
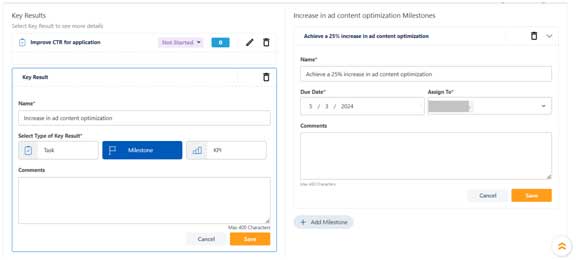
Key Result: A user will need to click on “Add Key Result” button to add a new Key Result (KR). User will now enter following details:
- Name: Enter the title/ name of the key result.
- Select Type of Key Result: Here the user will be selecting type as Milestone.
- Comments: An additional description of the key result will be entered by the user to describe the key result.
On the right panel, the user will now have an opportunity to add Milestones against the Key Result. To add additional milestones, users can click on “Add Milestone” button.
- Icon:
- Name: Enter the name/ title of the milestone.
- Due Dates: Enter the due date of the milestone.
- Assigned To: Assign the milestone to a user.
- Comments: Enter any additional comments about the milestone.
- Save: Save the milestone.
- Cancel: Cancel the milestone and all the details entered. This is applicable before clicking on the Save button.
Add Key Result à Type (KPI)
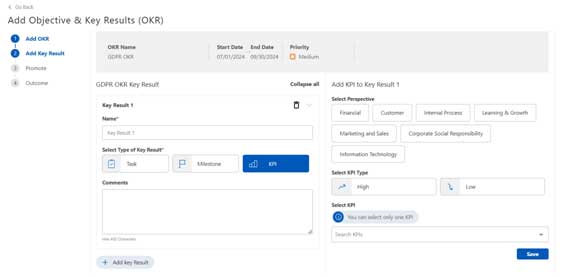
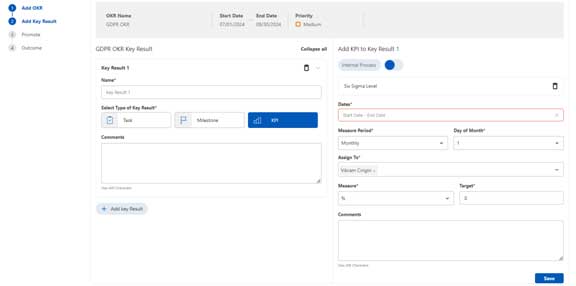
Key Result: A user will need to click on “Add Key Result” button to add a new Key Result (KR). User will now enter following details:
- Name: Enter the title/ name of the key result.
- Select Type of Key Result: Here user will be selecting type as KPI.
- Comments: An additional description of the key result will be entered by the user to describe the key result.
On the right panel, the user will now have an opportunity to select a KPI from the available list, against the Key Result. We are provided with filter options to filter the KPI data against Perspective and KPI Type.
From the KPI list, select a single KPI against which the key result will be measured. Once selected, the user will need to enter the measurement as well as Assignment values.
- Dates: Enter the start & end date of the KPI.
- Assigned To: Assign the KPI to a user.
- Measure Period: Select the measure period which is typically between weeks/months/ quarters/ yearly.
- Day of Week/ Month: Based on the measure period, this is a dynamic value which needs to be selected by user.
- Comments: Enter any additional comments about the KPI.
- Save: Save the KPI.
- Cancel: Cancel the KPI and all the details entered. This is applicable before clicking on the Save button.
Promote
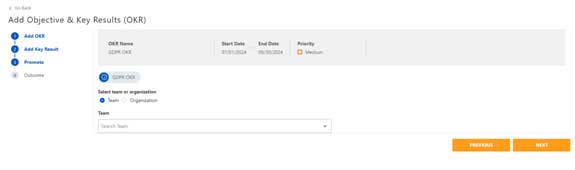
- An OKR can be promoted to either various teams or organizations (i.e. departments) within an organization.
- Select either a team or organization radio button.
- Multiple selections of all teams and organizations are possible for promotion.
- Once the OKR is promoted, then all users within that team or organization will see the project as an “Available” Project in their Projects List Page.
- If any user was previously Assigned a Key Result, then the OKR will by default be visible as an “Aligned” OKR with the user.
Outcome
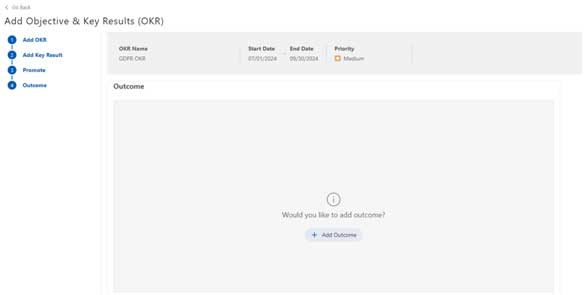
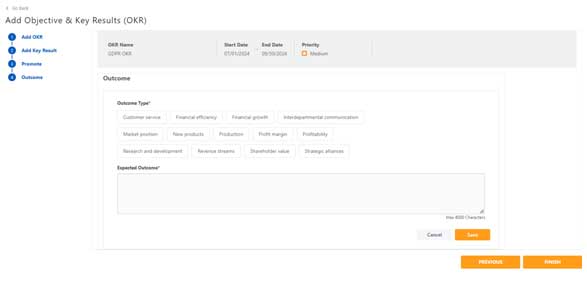
- As a process of Strategy Evaluation, it is required at the start of an OKR to add all the expected outcomes after the completion of the project.
- User has an ability to add multiple expected outcomes at the start of the OKR.
- Users can Select an Outcome Type and Enter the Expected outcome and save the record.
- After the completion of the OKR, an assessment will be done against the expected outcomes to assess the OKRs success against organization success.
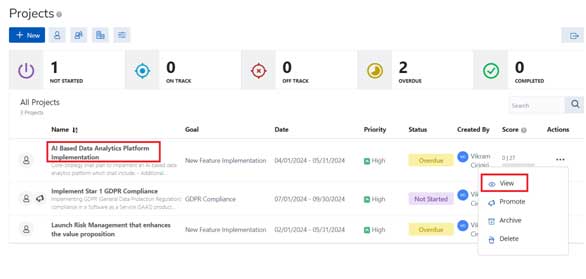
Project List #
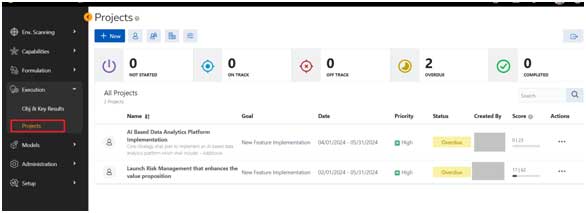
Projects
- The projects page can be accessed from the menu: Execution à Projects
- The projects visible to a user shall be the ones which the logged in user has either created or the project is promoted to him or his organization.
Common Components:
 : This button allows the user to create a new project.
 : Filter to show only individual project to user.
 : Filter to show only team project to user.
 : Filter to show only organization project to user.
 : Open Filter section for advanced filter options.
 : User has an ability to export results in XLSX, CSV, PDF formats.
 : Search project
 : A count of all the projects which are having “Not Started” status.
 : A count of all the projects which are having “On Track” status.
 : A count of all the projects which are having “Off Track” status.
 : A count of all the projects which have “Overdue” status.
 : A count of all the projects which are having “Completed” status.
Table Columns
- Column 1: Shows all icons to identify a project, e.g.: Promoted icon, individual icon.
- Name: Name of the project along with a brief description of the project.
- Goal: Name of the Goal to which the project is mapped to.
- Date: Displays the Start & End date of a goal.
- Priority: Displays the priority of the project
- Status: Current Status of the project
- Created By: The stakeholder/ creator of the project.
- Score: The score shows both “Actual| Target” score of the project
- Actions: Actions available on project page are:
- View
- View Project
- View Goal
- Promote: The user with Owner Privilege has the capability to promote a project to different individuals/ teams/ organizations.
- Archive: An active Project can be moved to Archive status, which is an end-of-life cycle event.
- Delete: A project can be deleted by the owner of the project.
- View
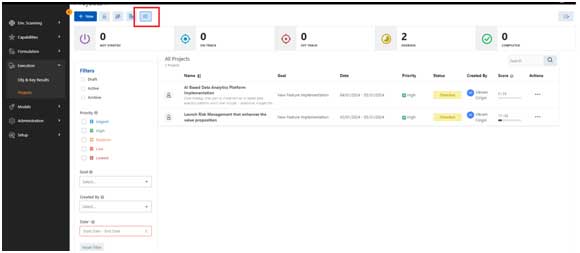
Filter
Users can filter data based on the criteria below.
- States
- Draft: Show Projects with Draft State
- Active: Show Projects which are in Active State. Active State includes (Not Started, On Track, Off Track, Overdue, Completed status).
- Archive: Show Projects which have been Archived.
- Priority: Filter Projects based on Priority of project.
- Goal: Filter Projects based on the selected Goal.
- Created By: Show projects based on the Stakeholder of the project.
- Dates: Show Projects which are between the selected dates.
- Reset Filter: Clear filter criteria to default state.
Add Project #

- Click on the “New” button on the top left to create a new Project.
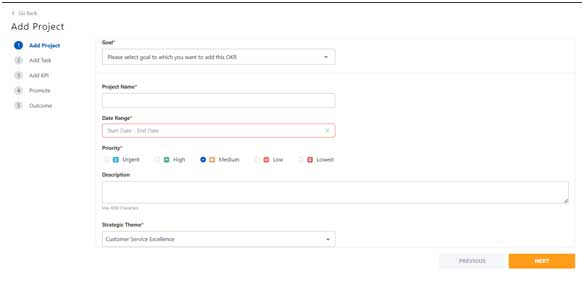
There are five sections to add to a Project.
- Add Project: A basic information about the project.
- Add Tasks: Ability to add tasks and milestones for a project.
- Add KPI: Select KPIs and their schedule for monitoring progress being made.
- Promote: Promote the project to various individual/ teams/ organizations.
- Outcome: Create information on the expected outcome of the project.
Add Project Tab
- Goal: Select the goal to which the current project needs to be mapped.
- Project Name: Enter the name of the project.
- Date Range: Select the date range for the target start & end date of project.
- Priority: Select the priority of the project.
- Description: Enter the description of the project for detailed information.
- Strategic Theme: Select a strategic theme against which the current project is mapped.
Add Task
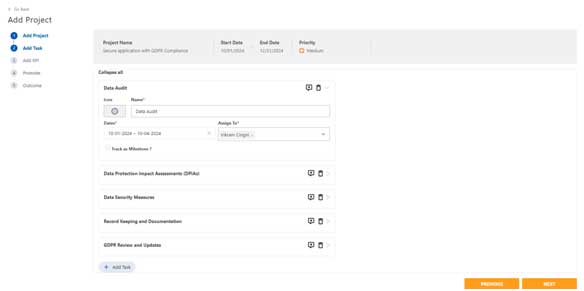
- Add tasks of the project,
- Enter Name of the Tasks
- Mark the start & end dates
- Assign Task to a team member.
- When a task is assigned to a team member, then by default the current project is aligned to the user.
- An email is sent to the assigned user, with information about the task assignment.
- An In-App notification is also generated for the user.
- A task can also be marked as a Milestone. In this case, only the End Date is considered as a Milestone Date when the milestone needs to be tracked.
Add KPI
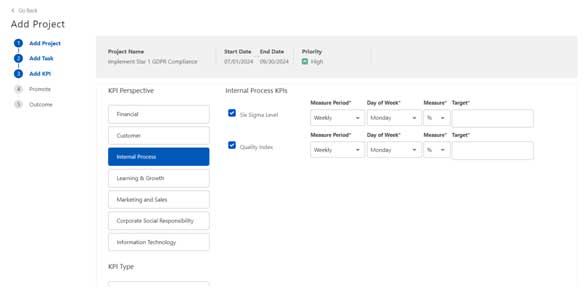
- The KPIs visible in Add KPI screen are a subset of the KPIs selected in the Goal. This ensures that appropriate KPIs are used for tracking progress.
- Select the KPIs which are relevant for the current Project.
- Select the Measure Period, Day of Week/ Month, Measure and Target Values for the KPI.
- Click on Next to Save the KPIs to be tracked against the project.
Promote
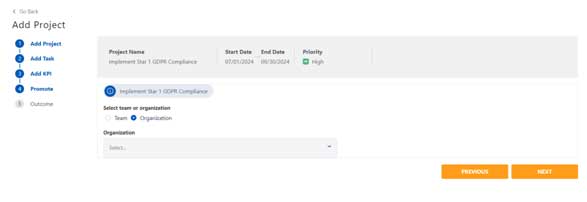
- A Project can be promoted to either various teams or organizations (i.e. departments) within an organization.
- Select either a team or organization radio button.
- Multiple selections of all teams and organizations are possible for promotion.
- Once the project is promoted, then all users within that team or organization will see the project as an “Available” Project in their Projects List Page.
- If any user was previously Assigned a Task, then the Project will by default be visible as an “Aligned” Project with the user.
Outcome
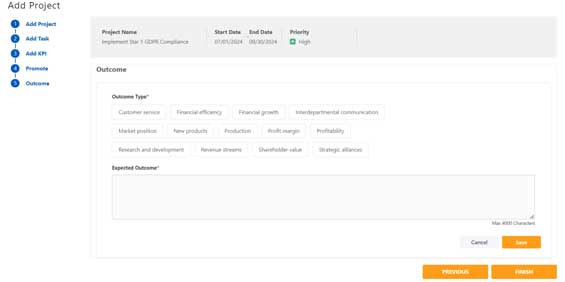
- As a process of Strategy Evaluation, it is required at the start of a project to add all the expected outcomes after the completion of the project.
- User has an ability to add multiple expected outcomes at the start of the project.
- Users can Select an Outcome Type and Enter the Expected outcome and save the record.
- After the completion of the project, an assessment will be done against the expected outcomes to assess the project success against organization success.
View Project Detail #

To View Project detail, user can click either on the Project name or select the View option on the Action Menu as marked.
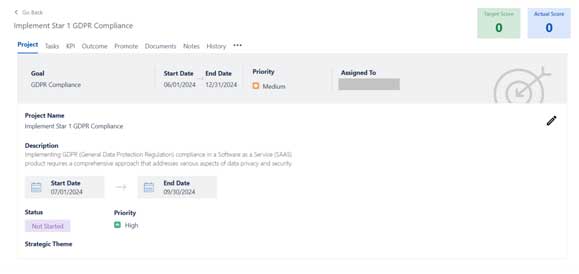
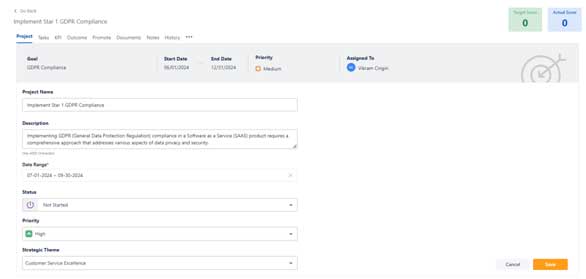
Project Overview
The heading of the Project Tab shows information of Goal:
- Goal: Name of the goal, the current project is mapped to.
- Status: Status of the Goal.
- Start Date: The start date of the goal.
- End Date: The end date of the goal.
- Priority: The priority of the goal.
- Created By: The stakeholder of the goal.
- Target Score: The calculated target score to be achieved by the project.
- Actual Score: the actual goal score achieved by the objectives of the project.
Other information related to the project are:
- Project Name: The name of the Project
- Description: the description provided of the Project.
- Start Date: Start Date of the project
- End Date: End Date of the project
- Status: Realtime Status of the project
- Priority: Priority assigned to the project
- Strategic Theme: Select the strategic theme relevant to the current project.

Tasks
- View all the tasks mapped with the current project.
- Information of task:
- : This is a milestone marker.
- Icon: The icon is used to plot the milestone on the gantt chart.
- Name: The name of the task/ milestone.
- Duration: The number of days of the task, based on start & end date.
- Dates: Selection of start and end dates.
- Assigned To: Assign to a user.
- Target: Target is a calculated value based on start and end dates.
- Actual: This is a value which is manually updated by user. This is an editable field.
- Status: Status can be manually changed.
- Action à Comment: Click on comment icon will provide a field to enter description for the comment.
- Action à Delete: User has an ability to delete the task.
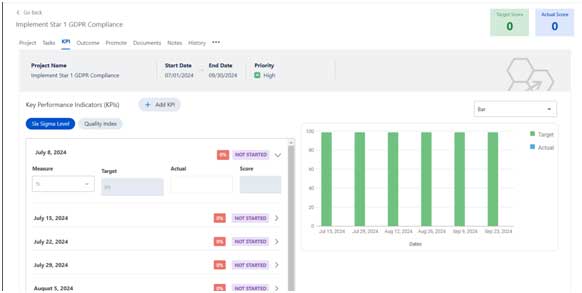
KPI
- Display all the KPIs which need to be tracked for progress.
- User has an ability to enter the Actual Progress data for each of the KPI.
- Based on Actual Data entered, the Score of the record and Status are calculated by the system and updated.
- The chart provided on the right side has an ability to show chart as a Bar chart/Line chart/ Area chart.
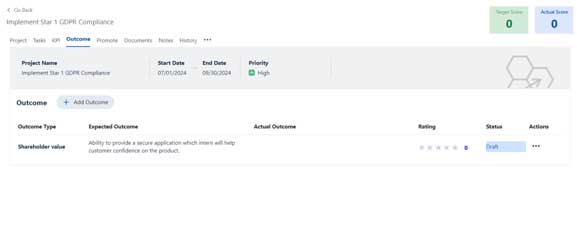
Outcome
- Users can view the list of expected outcomes for the project.
- After the project is complete, as part of evaluation process of the project, each of the outcomes is updated with actual outcome and rate the success of the outcome.
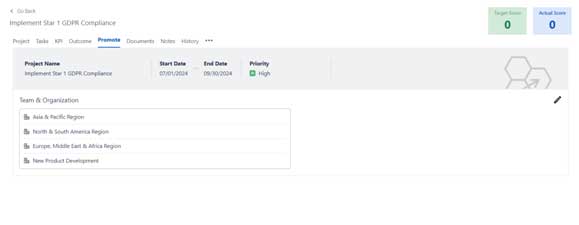
Promote
The promote tab shows all the teams and organizations to which the project is currently mapped.

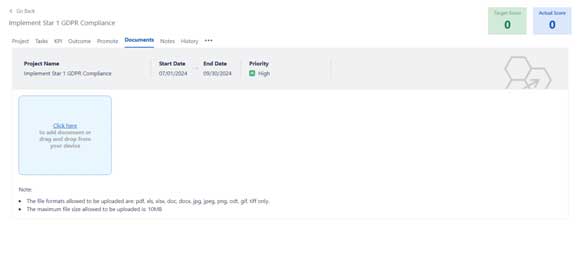
Documents
- For any project, the system provides the ability to upload multiple documents.
- The file formats allowed to be uploaded are PDF, XLS, XLSX, DOC, DOCX, JPG, JPEG, PNG, ODT, GIF, TIFF
The maximum file size allowed to be uploaded is: 10MB.
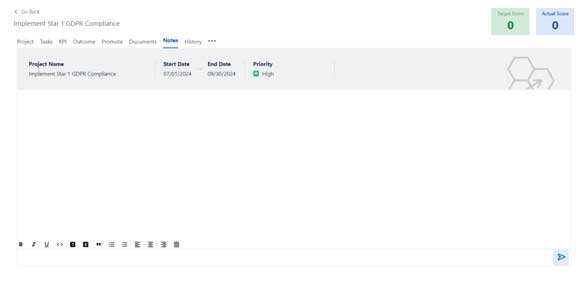
Notes
- For each project, the system provides an ability to add rich text as notes, which can be used for reference purposes.
- The notes component can add user annotations using @ symbol. Once a note is added with a username, an email is also generated as well as an In-App notification is generated for the mentioned user.
- Only The owner of the notes has permission to Edit/ Delete a Note. Other users will not be able to edit/ delete the notes of other users.
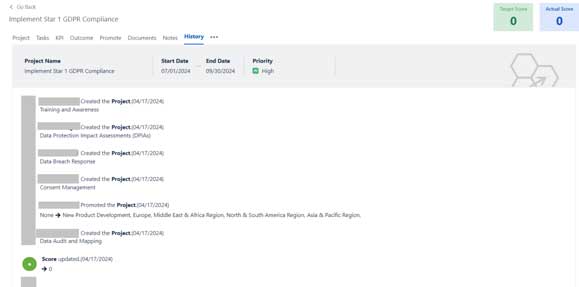
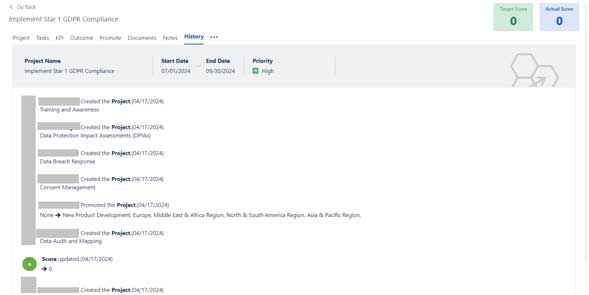
History
- The history tab provides an audit history of all the actions performed on the current project along with the details of the user who has changed it and date of change.
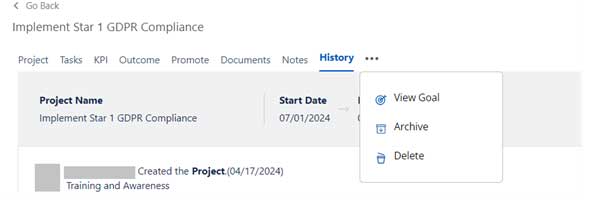
An additional menu is provided to simplify different actions for the user:
- View Goal: Ability to navigate to the Goal to view the additional details of the goal.
- Archive: Ability to archive the project, which can be visible for historical reference purposes.
- Delete: Completely delete the record from the system. Once deleted, there will not be any trace of the project maintained within the application.
Edit Project #
To Edit Project detail, user can click either on the Project name or select the View option on the Action Menu as marked.
Project Overview
The heading of the Project Tab shows information of:
- Goal: Name of the goal, the current project is mapped to.
- Status: Status of the Goal.
- Start Date: The start date of the goal.
- End Date: The end date of the goal.
- Priority: The priority of the goal.
- Created By: The stakeholder of the goal.
- Target Score: The calculated target score to be achieved by the project.
- Actual Score: the actual goal score achieved by the objectives of the project.
Other information related to the project which can be edited are:
- Project Name: The name of the Project
- Description: the description provided of the Project.
- Start Date: Start Date of the project
- End Date: End Date of the project
- Status: Realtime Status of the project
- Priority: Priority assigned to the project
- Strategic Theme: Select the strategic theme relevant to the current project.

Tasks
- Ability to view and edit all the tasks mapped with the current project.
- Information of task:
- : This is a milestone marker.
- Icon: The icon is used to plot the milestone on the gantt chart.
- Name: The name of the task/ milestone.
- Duration: The number of days of the task, based on start & end date.
- Dates: Selection of start and end dates.
- Assigned To: Assign to a user.
- Target: Target is a calculated value based on start and end dates.
- Actual: This is a value which is manually updated by user. This is an editable field.
- Status: Status can be manually changed.
- Action à Comment: Click on comment icon will provide a field to enter description for the comment.
- Action à Delete: User has an ability to delete the task.

KPI
- Display all the KPIs which need to be tracked for progress.
- User has an ability to enter the Actual Progress data for each of the KPI.
- Based on Actual Data entered, the Score of the record and Status are calculated by the system and updated.
- The chart provided on the right side has an ability to show chart as a Bar chart/Line chart/ Area chart.
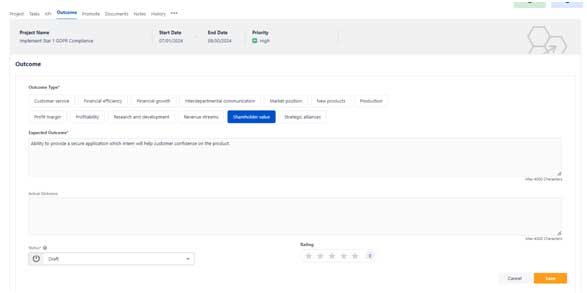
Outcome
- Users can view the list of expected outcomes for the project.
- After the project is complete, as part of evaluation process of the project, each of the outcome is updated with actual outcome and rate the success of the outcome.

Promote
The promote tab shows all the teams and organizations to which the goal.
Documents
- For any project, the system provides the ability to upload multiple documents.
- The file formats allowed to be uploaded are PDF, XLS, XLSX, DOC, DOCX, JPG, JPEG, PNG, ODT, GIF, TIFF
The maximum file size allowed to be uploaded is: 10MB.

Notes
- For each project, the system provides an ability to add rich text as notes, which can be used for reference purposes.
- The notes component can add user annotations using @ symbol. Once a note is added with a username, an email is also generated as well as an In-App notification is generated for the mentioned user.
- Only The owner of the notes has permission to Edit/ Delete a Note. Other users will not be able to edit/ delete the notes of other users.
History
- The history tab provides an audit history of all the actions performed on the current project along with the details of the user who has changed it and date of change.


Leave a Reply