Setup #
Organization Definitions #
- Organizational Profile: Users can create and update the organization’s profile, including its name, logo, description, and contact information. This profile acts as the identity of the organization within the platform.
- Mission, Vision, and Values: This section enables the organization to articulate its purpose, aspirations, and core principles that guide its culture and decision-making processes.
- Organizational Structure: It provides a visual and interactive representation of the company’s hierarchy. Users can define departments, divisions, and roles, illustrating how they interconnect and who reports to whom.
Organization #
The “Organizations” tab is a feature within the Core-Strategy platform that allows users to define and manage the essential aspects of their organization.
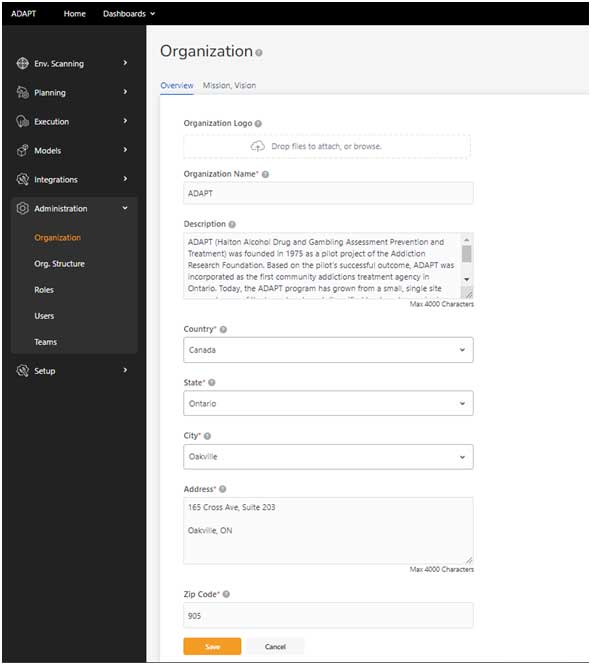
- Organization Logo: Select the organization’s logo from your computer. Preferred formats are JPEG, PNG, or SVG.
- Organization Name: Enter the full legal name of the organization in the provided text field.
- Description: Provide a detailed description of the organization. This might include history, purpose, and any other relevant information. The description can be up to 4000 characters.
- Country: Select the country where the organization is legally registered from the dropdown menu.
- State: Choose the state or province from the dropdown menu.
- City: Select the city from the dropdown menu or type it in if it is not listed.
- Address: Enter the street address, suite number, and any other relevant location details.
- Zip Code: Provide the postal or zip code associated with the organization’s address.
- Save: Click the ‘Save’ button to finalize the profile creation. If you wish to discard changes, click ‘Cancel’.
Mission and Vision Statements #
Accessing Mission, Vision, Value Section:
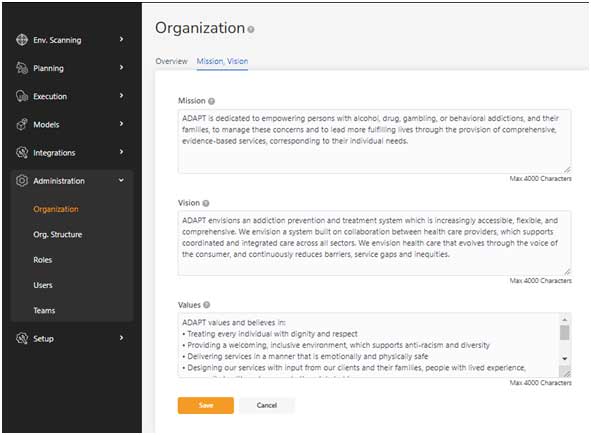
- Click on the ‘Mission, Vision’ tab at the top of the ‘Organization’ page to access the MVV editing area.
Update the Mission Statement:
- Click on the text box under the ‘Mission’ heading.
- Edit or enter the organization’s mission statement. The mission should succinctly state the purpose of the organization and its commitment to stakeholders. This statement can be up to 4000 characters.
Articulating the Vision Statement:
- Move to the ‘Vision’ text box.
- Craft or modify the organization’s vision statement. This should outline the long-term aspirations and the desired future state that the organization aims to achieve. Ensure it is inspiring and directional, also with a 4000-character limit.
Defining Organization Values:
- In the ‘Values’ section, list the core principles and beliefs. Click on the text area to add or edit the organization’s values.
- The values should reflect what the organization stands for, its culture, and its ethical framework. They serve as a guide for the behavior and decision-making process within the organization.
Save Changes:
- Review all the information to ensure accuracy and coherence.
Click the ‘Save’ button to update the MVV information. If you decide not to save the changes, click ‘Cancel’.
Organization Structure #
Overview:
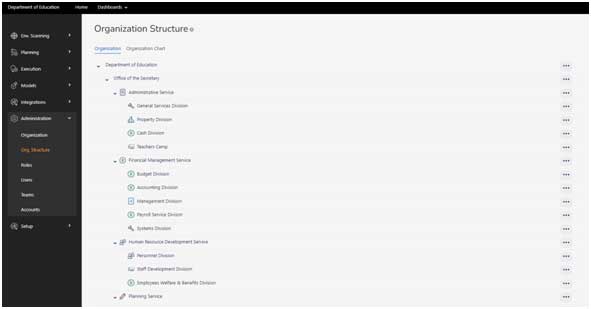
This section of the user manual instructs users on how to create and manage the organizational structure within the Core-Strategy platform. The structure is displayed in a hierarchical format, indicating the various departments and their respective subdivisions.
Accessing Organization Structure:
- From the ‘Administration’ menu on the left, click on ‘Org. Structure’.
- The screen will display the current organizational structure in a tree format.
Adding a New Department or Division:
- To add a new department or division, click on the ‘…’ (three dots) next to the existing department or at the organization level to reveal options.
- Select ‘Add New Department/Division’ from the dropdown menu.
Editing a Department or Division:
- Click on the ” (three dots) next to the department or division you wish to edit.
- Choose ‘Edit’ from the dropdown menu to open the detailed editing view.
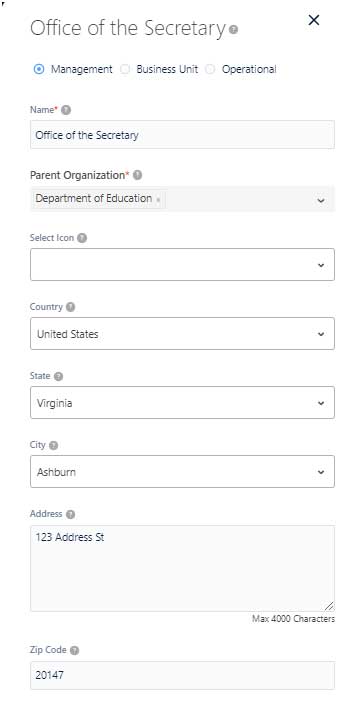
Filling in Department/Division Details:
- In the detailed view, enter or edit the name of the department or division.
- If it’s a sub-unit, select the parent organization from the dropdown menu.
- Choose an icon that represents the department or division.
- Fill in the location details including country, state, city, address, and zip code.
Setting the Type of Unit:
- Select the appropriate type for the unit: ‘Management’, ‘Business Unit’, or ‘Operational’.
Saving Changes:
- After reviewing the details, click ‘Save’ to update the organizational structure.
If you wish to discard changes, select ‘Cancel’.
Organization Chart
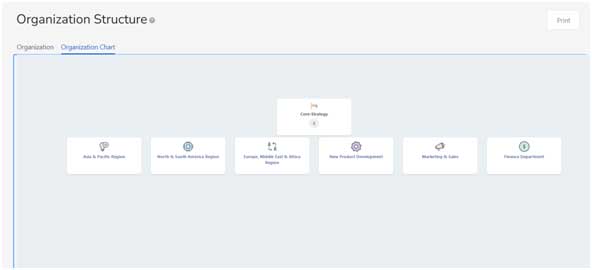
Review the Structure:
- After changes are made, revisit the ‘Org. Structure’ page to see the updated hierarchy.
- Expand or collapse sections to view the structure at different levels.
Making Further Edits:
- If further edits are needed, repeat the editing steps as necessary.
Final Confirmation:
- Once all edits are complete, review the entire structure for accuracy.
Ensure all departments and divisions are correctly placed within the organizational hierarchy.
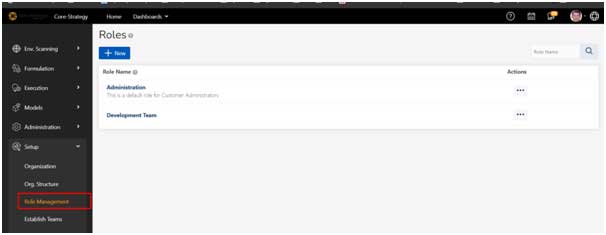
Role Management #
Roles
- The Roles screen can be accessed via menu in Setup à Role Management
- The roles page displays list of all the roles which are currently created within the user account.
- The user has an ability to create New Role by clicking on the “New” button.
- Clicking on any role will navigate the user to the detail page, where user can view the Access Permissions provided to the selected role.
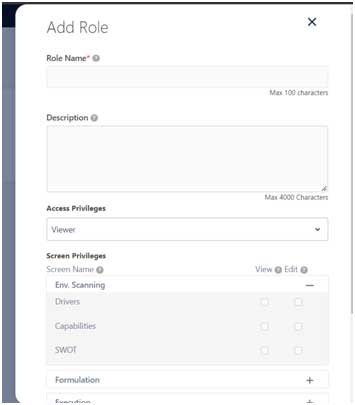
Creating a New Role:
- Users can add a new role by clicking the”” button, entering the role name, description of the role, Selecting the Access Privilege and defining screen based privileges provided to the user.
- Access Privilege: There are 3 access privileges available within the system:
- Owner:
- An owner can create/ edit/ delete any records which have been created within the organization.
- A record like Goal/ OKR/ Project need not be promoted to an owner for him/ her to access/ view the record. They have a complete view of the progress within the organization.
- He/she has all the access privileges within the application.
- An owner can Approve/ Reject a Strategy Plan.
- An owner can do all actions of contributors
- Contributor:
- Contributors can create/edit/delete Plans, Goals, Objectives. But needs approval from owner to start.
- Contributors can update progress updates on any objectives
- Contributors can only delete their Own plan/goal/objectives.
- Contributors can view/ edit only the records created by them or have been promoted to them by the creator of the record.
- Viewer:
- They only have view access to all the records which they have been promoted to them.
- Viewer role does not have Add/Edit/ Delete Permissions.
- Screen Privileges: The screen privileges are used to provide screen access to the specific role. The users can have either a View/ Edit screen privileges as specified.
- Owner:
Editing a Role:
- Existing roles can be edited or deleted by clicking on the “” (three dots) next to a role’s name and selecting the edit option to adjust its name, description, and access privileges.
Assigning Users to Roles:
- Once a role is defined, users can be assigned to these roles, thereby granting them the associated access rights within the platform.
Establish Teams #
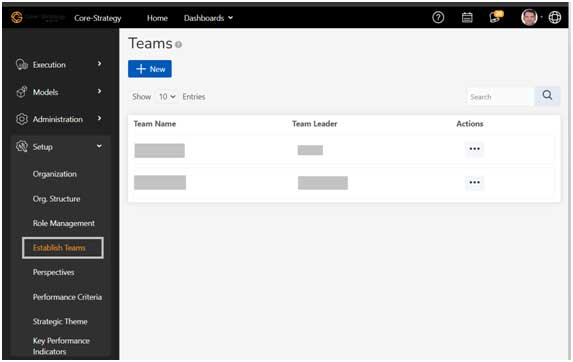
Core-Strategy provides a feature called “Establish Teams”, to provide a flexibility to add a group of users from various departments into a single group. This will help users to promote a Goal/ OKR/ Project to a team, which consists of various users from different organizations.
Viewing Teams:
- Navigate to the following location: Setup à Establish Teams
- Click on Establish Teams screen
- The list of teams is common for the whole organization. So, any user can view the list of all teams which have already been created for the organization.
Adding a New Team:
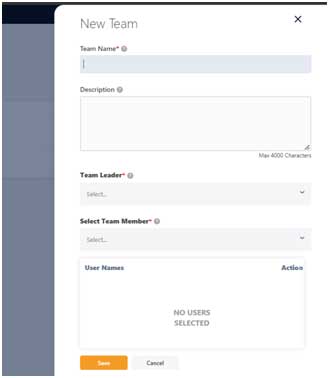
- Expand Administration Section.
- Select Establish Teams
- From the Teams Page, click on (+)
- Create Team Name*
- Enter Description
- Select Team Leader* by navigating Org. Chart
- Select Team Members* by navigating Org. Chart
- Click on Saveto establish Team or Click on Cancel to exit edit Team page.
View Team composition
- Expand Administration Section.
- Select Teams
- In the Search Box Type the Name of desired Team
- Once desired team is identified, click on Action (…) Icon
- Click on View to view the Team composition.
- Click on Save to save the Team settings changes or Click on Cancel to exit edit Team page.
Delete a Team
- Expand Administration Section.
- Select Teams
- In the Search Box Type the Name of desired Team
- Once the desired team is identified, click on Action (…) Icon
- Click on Delete to delete the Team.
User can be assigned to multiple teams, to view which team’s user belongs to follow the steps below.
Perspectives #
Perspective refers to a category of performance objectives or measures. Most organizations choose the standard four perspectives (financial, customer, internal process, and learning and growth). Organization can add or delete perspectives based on the need of the Organization. The default perspectives that are created when registering an organization are: Financial, Customer, Internal Process, Learning & Growth
View Perspective
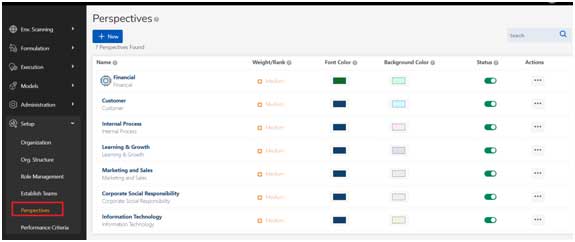
- Expand Setup Section.
- Select Perspectives
- In the Search Box Type the Name of desired Perspective
- Once desired perspective is identified, click on Action (…) Icon
- Click on View to view the Perspective.
- Enter the desired changes
- Click on Saveto save the changes or Click on Cancel to exit edit Perspective page.
Add a New Perspective
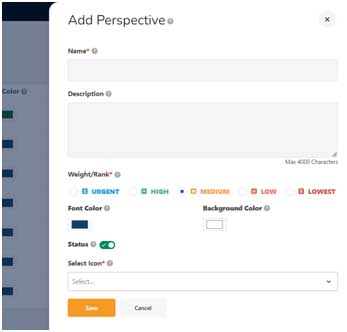
- Expand Setup Section.
- Select Perspective
- From the Perspective Page, click on (+)
- On the popup page for Perspective, enter perspective Name*
- Enter Description (Optional)
- Select Weight/Rank
- Select the desired font colour
- Select a background colour
- Select an icon for the newly created perspective from the Select Icon dropdown
- Click onSaveto establish the perspective orclick onCancelto exit Perspectives.
Delete a Perspective
- Expand Setup Section.
- Select Perspectives
- In the Search Box Type the Name of desired Perspective
- Once the desired perspective is identified, click on Action (…) Icon
- Click on Delete to delete the perspective.
Performance Criteria #
Performance criteria express what is to be measured and why (i.e., how success is defined). The selection process involves identifying dimensions and/or variables relevant to an enterprise’s successful operation. The default Performance Criteria that are created when registering an organization are:
New Product Launch Success, Competitive Advantage, Market Share, Customer Satisfaction, Profitability, Overall Business Performance, Return-on-Sales, Reputation and Image, Return-on-Investment, Sales Increase, Share Increase, Providing Quality Goods/Services.
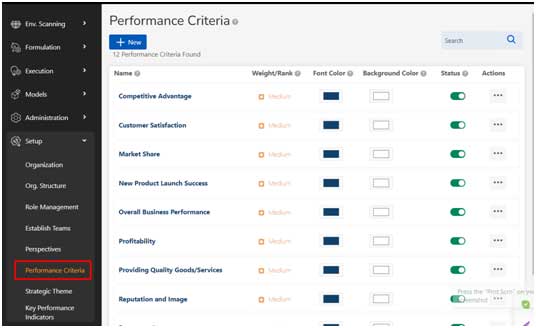
View Performance Criteria
- Expand Setup Section.
- Select Performance Criteria
- In the Search Box Type the Name of desired Performance Criteria
- Once desired performance criteria are identified, click on Action (…) Icon
- Click on View to view the Performance Criteria.
- Enter the desired changes
- Click on Saveto save the changes or Click on Cancel to discard changes.
Add a New Performance Criteria
- Expand Setup Section.
- Select Performance Criteria
- From the Performance Criteria Page, click on(+)
- On the popup page for Performance Criteria, enter performance criteria Name*
- Enter Description (Optional)
- Select Weight/Rank
- Select the desired font colour
- Select the desired background colour
- Click onSaveto establish the Performance Criteria orclick onCancelto discard changes.
Delete Performance Criteria
- Expand Setup Section.
- Select Performance Criteria
- In the Search Box Type the Name of desired Performance Criteria
- Once the desired performance Criteria is identified, click on the Action (…) Icon
- Click on Delete to delete the performance criteria.
Strategic Theme #
Strategic themes are the primary, high-level business strategies that form the basis for the Organization’s business model. Strategic Themes are also referred as themes as “pillars of excellence”. The default Strategic Themes that are created when registering an organization are:
Business Growth, Operational Excellence, Product Development, Customer Service Excellence, Innovation, Sustainability
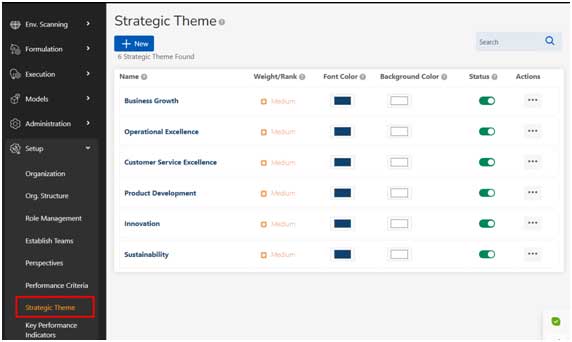
View Strategic Themes
- Expand Setup Section.
- Select Strategic Themes
- In the Search Box Type the Name of desired Strategic Themes
- Once desired Strategic Themes is identified, click on Action (…) Icon
- Click on View to view the Strategic Themes.
- Enter the desired changes
- Click on Saveto save the changes or Click on Cancel to exit edit Strategic Themes page.
Add a new Strategic Theme
- Expand Setup Section.
- Select Strategic Themes
- From the Strategic Themes Page, click on(+)
- On the popup page for Strategic Themes, enter strategic themes Name*
- Enter Description (Optional)
- Select Weight/Rank*
- Select the desired font colour
- Select the desired background colour
- Click onSaveto establish the role orclick onCancelto exit Strategic Themes.
Delete a Strategic Themes
- Expand Setup Section.
- Select Strategic Themes
- In the Search Box Type the Name of desired Strategic Themes
- Once the desired Strategic Themes is identified, click on Action (…) Icon
- Click on Delete to delete the Strategic Theme.
Key Performance Indicators #
Key performance indicators (KPIs) specifically help determine a company’s strategic, financial, and operational achievements, especially compared to those of other businesses within the same sector.
Core-Strategy provides a default list of over 200+ KPI library which will help organizations in identification and creation of KPIs. Each organization can now customize this list and update/ create KPIs as per their organizational requirements.
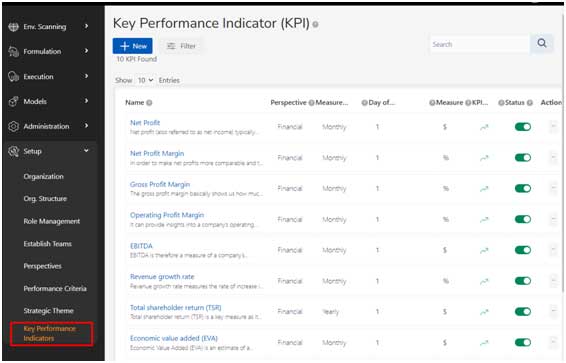
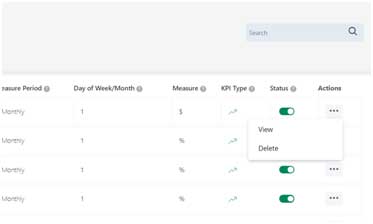
View KPI List
- To view KPIs within the organization, click on Setup à Key Performance Indicators as marked in the screen.
- All the KPIs available are visible on the list page.
- All KPIs are enabled by default.
- User has the ability now to disable a KPI if they wish not to capture metrics against the specified KPI.
- Perspective: The KPIS show their mapping to the Perspective like Financial, Customer, Internal Process, Marketing & Sales etc.
- Measure Period: All KPIs have a default measure period. These are also customizable according to organizations need.
- Day of Week/ Month: A KPI will need to be measured on a specific day. This default can also be set.
- KPI Type: A KPI types are either increasing/ decreasing. A KPI type explains if a KPI is better if it was a metric shows an increase from a target/ a decrease from a target value. Based on KPI type, all data analytics are triggered within the system.
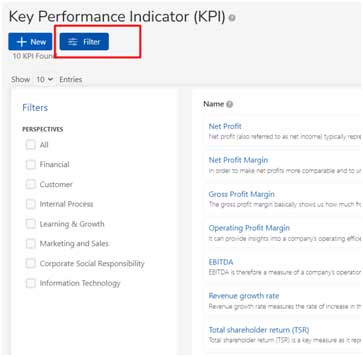
Filter Option
KPI search can be simplified by filtering data on the perspectives
Add KPI
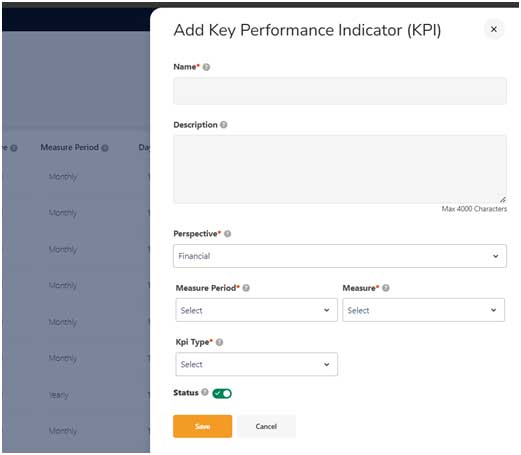
- Expand Setup Section.
- Select Key Performance Indicators.
- From the Key Performance Indicators Page, click on+New Item
- A box with different fields for entering KPI information will be displayed below
- Enter a name for KPI
- Enter Description (Optional)
- Select Perspective from dropdown.
- Select a Measure Period from the dropdown
- Select Day of Week/Day of Month from dropdown.
- Select a measure from the dropdown. It can be any of %, #, $, Rating etc.
- Select a KPI Type, which indicates if a KPI is performing better when increasing/ decreasing.
- Select a status for the KPI
- Click on Saveto save the changes in the KPI tab.
Delete KPI
Core-Strategy provides an ability to permanently delete a KPI from the system if desired by using the Delete KPI from the Actions Menu.


Leave a Reply